Thursday, April 27, 2017

Crochet Lulu Pom Pom Scarf


Let's face it. Kids things are cute. They're miniature and the kiddos look good modeling anything! Anyone who knows me knows that I wanted a lot of kids and at least one of each. I love my 3 boys but I still crave for a baby girl! Anyway, I never get tired of designing for little girls.... A part of my little inner-girly self jumps out to play ;)


Today was Crazy Hair Day at preschool so I tied the boys hair. My youngest doesn't have much hair so he just got "batman ears" (aka pigtails). My other son had what looked like palm trees as a Mohawk ha-ha!


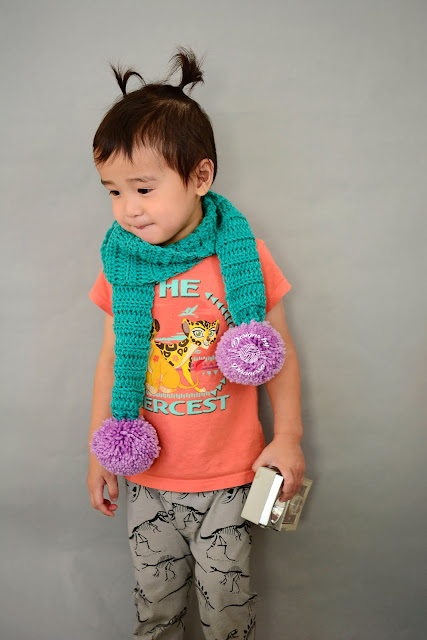
Anyway back to the scarf... I wanted a simple textured scarf and to add a little fun, I've added pom poms to the ends of the scarf.


This scarf is made using half double crochets into the back loops (which creates the ribbing texture). It's a fairly quick project since it's made for a child. Of course, it's easily adjustable for the girly girl in us adults too!


Oops! I forgot to check my white balance settings & the "Jade" color looks more blue!


Supplies:


Worsted Wegith Yarn | I used Red Heart Super Saver in Jade & Orchid

6mm Crochet Hook
Yarn Needle
Pom Pom Maker (Large) | You can use a cardboard or your hands but I would recomend a pom maker
Scissors

Abbreviations:
ch - Chain

st(s) - Stitch(es)
hdc - Half Double Crochet

PATTERN: 4" x 46" not including Poms (but so easy to adjust!)


Row 1: Leaving a 6" tail, Ch17, 1 hdc into the 3rd ch from the hook & into each ch st across. 


Adjustments: You can chain as many chains as you want the width of the scarf. Chaining 17 is approx 4" for my tension.


Row 2: Ch2 & turn. 1hdc into same st and into each st across into the back loops only


Repeat Row 2 until scarf measures approx 40 inches 

Adjustments: Measure as you go, make it any length you want!


Fasten off leaving a 6" tail.


Using a yarn needle, weave ends through every other stitch and back into the beginning and cinch up. Do this on the other end as well.


Pom Pom


Using a large pom pom maker, make pom by wrapping yarn around pom pom maker until it's nice and full. You can wrap less rounds if you want a looser pom. 


Cut the middle using a sharp pair of scissors (or you'll be fighting with the thickness of the pom).


Once pom is cut, run a long piece of yarn through the middle and tie, wrap it around the other end and tie 2 more knots.


 Attach it to the ends of the scarf. Tie a few knots and then run the ends back into the pom and trim it on the other side. Trim as necessary to get nice round Poms. 


I love how it turned out. Easy Stitches & cute poms!


For Handmade by Phanessa patterns, visit my shops:

Etsy         Ravelry          Craftsy        Knit Picks

You may sell products using ©Handmade by Phanessa Patterns, but please give credit and link back to the patterns. Do NOT use any of my photos or copy/distribute any of my patterns as your own. If you share my free patterns, please link back to original pattern page. Please send me a message if there are errors to any of my patterns to handmadebyphanessa@gmail.com. Thank you!

© 2017 Handmade by Phanessa, All rights reserved. 


Tuesday, April 18, 2017

Crochet Lacy Spring Scarf


I was trying a new stitch & wanted to use this beautiful yarn I bought! It was the perfect size for my friend's 10 year old daughter. ♥


Let's dive right into it, shall we!?


Supplies:


1 Skein Red Heart - Gleam

7mm Crochet Hook
Yarn Needle
Scissors

Abbreviations:
ch - Chain

st(s) - Stitch(es)
sk - Skipsl st - Slip Stitch
sc - Single Crochet
dc - Double Crochet


PATTERN 


Finished Measurements: 39" long | 10" wide 


Foundation: Ch20 (in multiples of 6 Plus 2)


Row 1: 1sc into the 2nd ch from hook & 1sc  into the next st, *ch3, sk 3 sts, 1sc in the next 3 sts. Repeat from * until last 5 sts, sk 3 sts, 1 sc in the last 2 sts. Ch1 & turn.


Row 2: 1sc in the 1st st, *5dc into the ch3 space, sk 1 st, 1 sc in the next st. Repeat from * across. Ch3 & turn.


Row 3: sk 2 sts, *1sc into the next 3 sts (middle 3 sts of dc from previous shell st), ch3, sk3 sts. Repeat from * until last 2 sts . ch2, 1sc in last st. ch3 & turn.


Row 4: 2dc into the ch2 sp, *sk 1 st, 1sc into next st, sk 1 st, 5dc into the ch3 space. Repeat from * until the ending ch space. 3dc into the space at the end. ch1 & turn.


Row 5: 1sc in the next 2 sts, *ch3, sk 3 sts, 1sc in next 3 sts. Repeat from * until last 5 sts, ch3, sk 3 sts, 1sc in last st. & 1sc in the top of the ch3. ch1 & turn.


Repeat Rows 2-5 until desired length. I pretty much only wanted to use the one skein. Fasten off and weave in ends. 


For Handmade by Phanessa patterns, visit my shops:

Etsy         Ravelry          Craftsy        Knit Picks

You may sell products using ©Handmade by Phanessa Patterns, but please give credit and link back to the patterns. Do NOT use any of my photos or copy/distribute any of my patterns as your own. If you share my free patterns, please link back to original pattern page. Please send me a message if there are errors to any of my patterns to handmadebyphanessa@gmail.com. Thank you!

© 2017 Handmade by Phanessa, All rights reserved. 

Crochet Basket with Recycled Fabric


So many things going on this week! It's Earth Day & for my son it's Teacher Appreciation Week! They're off track during the actual Teacher Appreciation Day so they celebrate early! We're also celebrating Mother's Day early with a Mother's Day Tea party in his class this week. I'm excited to be a part of it. His face always lights up when he sees me and he gets super excited! That's enough to make mommy's heart fill with warmth.

I own a sewing machine. Have I done any sewing lately? No. In fact, I barely know how to sew things. I wish I had more time to use it and make all sorts of things! So.... I end up with lots of  fabric from projects I want to do and left over fabric from previous projects (because I bought too much) or just extra fabric because it was on sale. That sale. It always gets me!


I've dove into crocheting and knitting more exclusively last year and thought I would recycle my fabric (You're welcome Earth). The process of making yarn isn't hard but it is a little time consuming. You can go even further and use different fabric, twist the strips together to make beautiful ropes but.... that project is for another day!


I decided to make a little basket. Each day of the week has a theme in class. Today's theme is "Swag bag with your teacher's favorite treats!" Okay, so it's not a bag and I'm ashamed to say I don't know her favorite treats. So, I made a basket and filled it with Ghirardellii & Lindt Chocolates. Yum!


You can cut the fabric into any size you'd like and use the appropriate size hook for the project. For this basket, I cut 1.5" strips and used a 12mm crochet hook. I love these Acrylic Crochet Hooks from Hobby Lobby!


Supplies:

Fabric Yarn (Sorry I don't remember how many yards. 1.5? I didn't use it all)
12mm Crochet Hook
Tapestry Needle with large eye
Scissors

Stitch Marker

Abbreviation:

ch - Chain
st(s) - Stitch(es)
sl st - Slip Stitch
sc - Single Crochet

You can use any scrap fabric yarn you'd like. I think these are Calico Cotton Fabric (From Joann's). I purchased several different patterns to make nursing covers, pillow cases, car seat covers, etc.


Fabric Yarn:

The strip of fabric yarn is approx. 1.5" thick. The photos you will see below are from a previous project but it's the same process.


Cut about 1.5" from one edge & just rip it until about 1" from edge. Do not rip it through. Then cut another slit about 1.5" and rip it in the other direction. This will give you one continuous strip. It's sort of a giant zig-zag shape. Roll it into a ball. That's it! Like I said before, you can twist it so that's it's more durable and stiff. I am reaaaaaally lazy and have very little time so I used it as is and it worked out for me.


Basket Pattern:

BASE:
Round 1: Starting with a magic ring, ch1, 10 sc into the ring, do not sl st to the top of the first sc

Now working in a continuous round (place stitch marker in the first st of each round).

Round 2 (Increase): 2 sc into each st around


Skip to Round 4 if you want your base this size.


Round 3 (Increase): *1 sc into first st, 2 sc in the next st. Repeat from * around.


SIDE:
Round 4: 1 sc into each st in the BACK LOOPS only around

Round 5: 1 sc into each st (in both loops now) around


Repeat round 5 until you get the desired height of basket.


Finish off with a round of slip stitches. Fasten off and weave in all ends.


I originally put handles on it and didn't care for the look so I frogged and just eliminated the handles. I was much happier with the results! My boys are my models so when my 2 year old saw that I completed the basket he asked "Hat done? Take picture?" and he put it on. I started laughing and told him it was a basket. To be fair, I do make mostly hats!


For other Handmade by Phanessa patterns, visit my shops:

Etsy         Ravelry          Craftsy        Knit Picks

You may sell products using ©Handmade by Phanessa Patterns, but please give credit and link back to the patterns. Do NOT use any of my photos or copy/distribute any of my patterns as your own. If you share my free patterns, please link back to original pattern page. Please send me a message if there are errors to any of my patterns to handmadebyphanessa@gmail.com. Thank you!

© 2017 Handmade by Phanessa, All rights reserved. 
Monday, April 17, 2017

Crochet Mini Basket


I've been so bad in planning and getting things done lately. I often times feel so overwhelmed by everything! Juggling a full time job, hobbies & still making time for my family can be really challenging!

Of course Easter snuck up on me (as with everything else!). I wanted to make my nieces and nephew something cute and something that I can make fast. I didn't want to give them more candy than they need so I figured a little basket that will fit 2 eggs was good enough. One egg for a treat, and one egg for some money (who doesn't love money?).

I wanted to use super bulky yarn (remember, fast?) So I went into my yarn stash.


Would you believe, I did not have the colors I wanted?? I did find Easter colors in worsted weight yarn so I decided to use that instead. 

In order for me to still make this a quick project, I used a 9mm crochet hook & 2 strands of the worsted weight yarn. I only used one skein of each color pulling one strand from the center pull & the other strand from the outside of the skein.


Let's get started then! For the full video tutorial, scroll to the bottom of post.

Supplies:

Worsted Weight Yarn | Red Heart Super Saver (Orchid, Minty, Perfect Pink)
US N/9mm Crochet Hook
Tapestry Needle
Scissors

Abbreviation:

ch - Chain
st(s) - Stitch(es)
sl st - Slip Stitch
hdc - Half Double Crochetdc - Double Crochet

Pattern notes: The chain 2 at the beginning of each round does not count as a double crochet stitch.

Pattern:

Round 1: Starting with a magic ring (see video at the end of post if you don't know what this is)
ch2, 12 dc into the ring, sl st to the top of the first dc (12 sts)

Round 2: ch2, 2 dc into each st around, sl st to the top of the first dc (24 sts)

Round 3: ch2, 1 dc into BACK LOOPS ONLY in each st around, sl st to the top of the first dc (24 sts)

Round 4-5: ch2, 1 dc into each st around, sl st to the top of the first dc (24 sts)

Basket Handle:

ch17, 1 hdc into the 2nd ch from hook & into each ch st (16 sts), 
skip a st, sl st into the next st. Fasten off.

Using a 6" piece of yarn, sew the other side of the handles onto basket with the yarn needle. Fasten off and weave in all ends. I used these for my boys' photos (also a last minute thing!) before giving them to my nieces and nephew.

My "baby"


My middle baby


My oldest baby


Here is a full video tutorial for the Crochet Mini Basket for those of you who are visual learners.


For other Handmade by Phanessa patterns, visit my shops:

Etsy         Ravelry          Craftsy        Knit Picks

You may sell products using ©Handmade by Phanessa Patterns, but please give credit and link back to the patterns. Do NOT use any of my photos or copy/distribute any of my patterns as your own. If you share my free patterns, please link back to original pattern page. Please send me a message if there are errors to any of my patterns to handmadebyphanessa@gmail.com. Thank you!

© 2017 Handmade by Phanessa, All rights reserved. 

Wednesday, April 12, 2017

Crochet Carrie On Tote by Wool And The Gang


I love collaborating with WOOL AND THE GANG! The staff is so awesomely nice & the yarn is amazing! They have so many different kits to choose from as well if you're just looking for a project with no thinking or designing involved.

They sent me a crochet kit for the Carrie On Tote. I love tote bags. They're fun to make and mostly always very easy. This one is rated easy and it really was simple. Any beginner crocheter can make this tote.


This kit contains 4 balls of Mix Tape yarn, straps, crochet hook, tag & instructions. I chose Lipstick Red and it was gorgeous! I've never used the flat yarn before and wasn't sure how I'd like it. I was expecting to maybe use a large hook for this project but it came with a 6.5mm crochet hook. It worked out just fine. The pattern was a little different than what I'm used to but very easy to understand. After you get past the base, it's a no brainer. 


I caught a cold when I received this kit but of course, that didn't stop me! ;) As soon as the Tylenol kicks in, I pick up the WIP! 


I love that there are 2 options for attaching the strap. I didn't care for the look of the first option which required you to sew the straps from the top all the way to the bottom. I chose the 2nd option using the screws. I attached my personal tag on the bag because it covered up where I ended my bag with slip stitches really well. 


I'm so impressed with this super simple tote and it's perfect for everyday use. I may throw a party using this kit! All my friends prefer to learn crochet rather than knitting. Hoping to get that started soon!

Crochet kit provided by WOOL AND THE GANG


For other Handmade by Phanessa patterns, visit my shops:

Etsy         Ravelry          Craftsy        Knit Picks

You may sell products using ©Handmade by Phanessa Patterns, but please give credit and link back to the patterns. Do NOT use any of my photos or copy/distribute any of my patterns as your own. If you share my free patterns, please link back to original pattern page. Please send me a message if there are errors to any of my patterns to handmadebyphanessa@gmail.com. Thank you!


© 2017 Handmade by Phanessa, All rights reserved. 

Friday, March 31, 2017

Crochet Lacy Scarf


Spring is in the air! This also means it's the worst season for allergy sufferers. Luckily, mine is controlled by allergy shots.

This project is quick and easy using double crochet stitches. It's a perfect beginner's pattern and easily adjustable. 


If you have purchased patterns from me, You'll know that I like to make most of my patterns adjustable to give you the flexibility to adjust the pattern to your specific needs. Check it out if you haven't:

Etsy         Ravelry          Craftsy        Knit Picks

Let's get started then!

Supplies:

Worsted Weight Yarn | Caron Cake in Buttercream (as pictured)
6.5mm Crochet hook
Tapestry Needle
Scissors

Abbreviation:

ch - chain
st(s) - stitch(es)
sl st - slip stitch

dc - double crochet

Pattern notes: You can adjust this pattern by chaining in multiples of 5 plus 3. The side of the scarf has 2 dc edging (one of which is the ch3 at the beginning of each row).


SCARF PATTERN:

Row 1: ch30, plus 3 (33 total). 1dc into the 3rd ch from hook. *sk 4 sts, (2dc, ch1, 2dc) into next st. Repeat from * until last 5 sts. sk 4 sts, 2dc into last st.

Row 2: Ch3 & turn, 1dc into the same st. (2dc, ch1, 2dc) into all the ch1 spaces across. After working in the last ch1 space, 2dc into the 3rd ch from the turning ch below.

Repeat Row 2 until desired length of scarf. I used almost all of the Caron Cake yarn. It was already long so I decided to just stop.

Ending Row*ch4, 1sc into the next ch1 space. Repeat from * until end. sl st into the 3rd ch from the turning ch below.

This will match the other end and totally not necessary (if you don't care) but I did it anyway... 

That's it! Like I said, easy peasy, lemon squeezy (my son's favorite thing to say) ;)


For other Handmade by Phanessa patterns, visit my shops:

Etsy         Ravelry          Craftsy        Knit Picks

You may sell products using ©Handmade by Phanessa Patterns, but please give credit and link back to the patterns. Do NOT use any of my photos or copy/distribute any of my patterns as your own. If you share my free patterns, please link back to original pattern page. Please send me a message if there are errors to any of my patterns to handmadebyphanessa@gmail.com. Thank you!

© 2017 Handmade by Phanessa, All rights reserved. 


Crochet Lulu Pom Pom Scarf

Let's face it. Kids things are cute. They're miniature and the kiddos look good modeling anything! Anyone who knows me knows ...