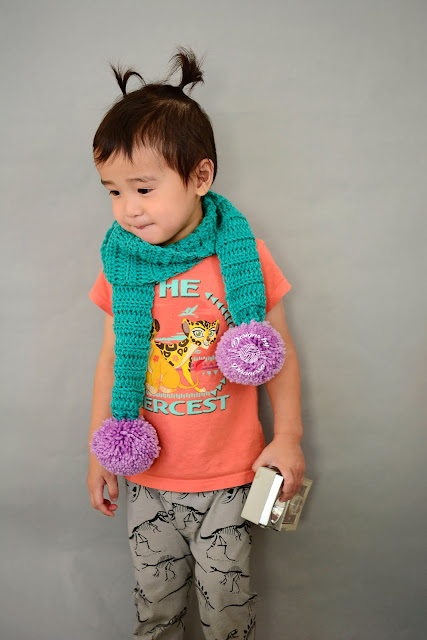
Today was Crazy Hair Day at preschool so I tied the boys hair. My youngest doesn't have much hair so he just got "batman ears" (aka pigtails). My other son had what looked like palm trees as a Mohawk ha-ha!
Anyway back to the scarf... I wanted a simple textured scarf and to add a little fun, I've added pom poms to the ends of the scarf.
This scarf is made using half double crochets into the back loops (which creates the ribbing texture). It's a fairly quick project since it's made for a child. Of course, it's easily adjustable for the girly girl in us adults too!
Oops! I forgot to check my white balance settings & the "Jade" color looks more blue!
Supplies:
Worsted Wegith Yarn | I used Red Heart Super Saver in Jade & Orchid
6mm Crochet Hook
Yarn Needle
Pom Pom Maker (Large) | You can use a cardboard or your hands but I would recomend a pom maker
Scissors
Abbreviations:
ch - Chain
st(s) - Stitch(es)
hdc - Half Double Crochet
PATTERN: 4" x 46" not including Poms (but so easy to adjust!)
Row 1: Leaving a 6" tail, Ch17, 1 hdc into the 3rd ch from the hook & into each ch st across.
Adjustments: You can chain as many chains as you want the width of the scarf. Chaining 17 is approx 4" for my tension.
Row 2: Ch2 & turn. 1hdc into same st and into each st across into the back loops only
Repeat Row 2 until scarf measures approx 40 inches
Adjustments: Measure as you go, make it any length you want!
Fasten off leaving a 6" tail.
Using a yarn needle, weave ends through every other stitch and back into the beginning and cinch up. Do this on the other end as well.
Pom Pom
Using a large pom pom maker, make pom by wrapping yarn around pom pom maker until it's nice and full. You can wrap less rounds if you want a looser pom.
Cut the middle using a sharp pair of scissors (or you'll be fighting with the thickness of the pom).
Once pom is cut, run a long piece of yarn through the middle and tie, wrap it around the other end and tie 2 more knots.
Attach it to the ends of the scarf. Tie a few knots and then run the ends back into the pom and trim it on the other side. Trim as necessary to get nice round Poms.
I love how it turned out. Easy Stitches & cute poms!
For Handmade by Phanessa patterns, visit my shops:
You may sell products using ©Handmade by Phanessa Patterns, but please give credit and link back to the patterns. Do NOT use any of my photos or copy/distribute any of my patterns as your own. If you share my free patterns, please link back to original pattern page. Please send me a message if there are errors to any of my patterns to handmadebyphanessa@gmail.com. Thank you!
© 2017 Handmade by Phanessa, All rights reserved.


No comments:
Post a Comment