Kids are hard to photograph because they are busy and they don't stay still. There are a few things I have that get their attention. I have an attachment to the hot shoe that allows me to clip my iPhone on it and play kiddy music videos...
One of the things I love are the cute little "buddy" things you put around the lens to get their attention. This is the first of many I'll make if it works. We will see!
I searched "Crochet Camera Buddy" on pinterest and so many things popped up! My favorite was of a caterpillar. Here's my shot at it!
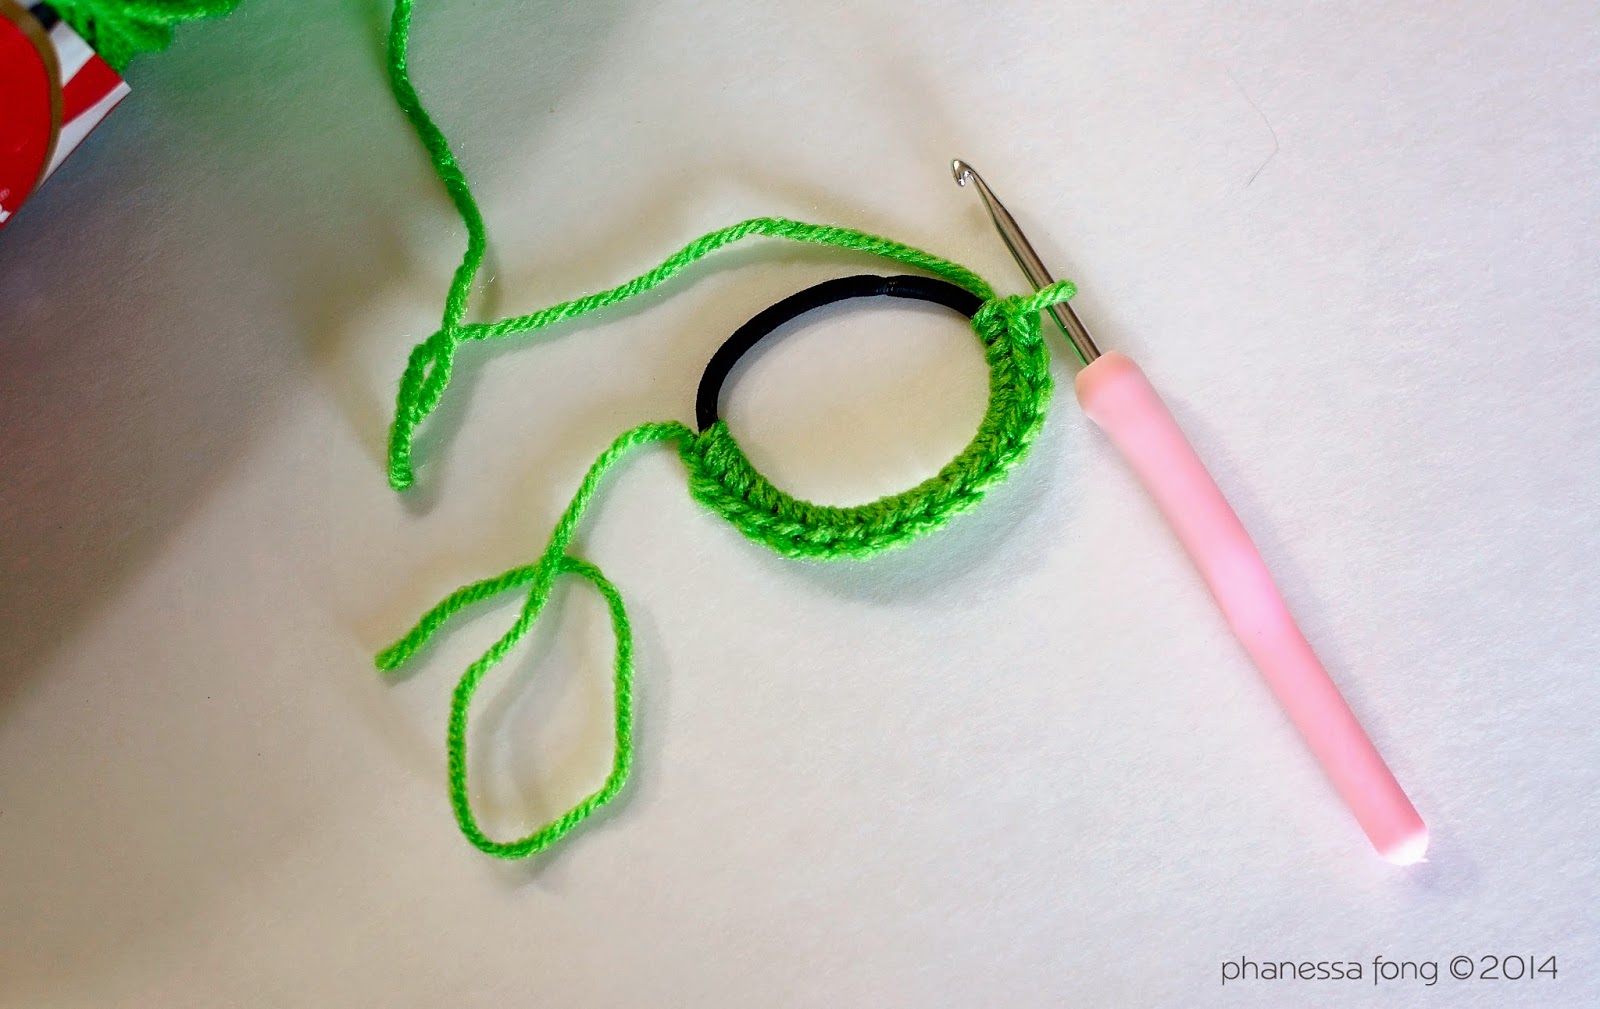
I used a hair tie. So convenient huh?!? Single crocheted all the way around. & then 2 more rows of double crochets.
2 rows of double crochets for the caterpillar.
Stitch in some eyes & a smile. Sew onto the ring. How cute is that?!
Wednesday, October 29, 2014
Saturday, October 25, 2014
Crochet Women's Peaked Hat
I absolutely LOVE this hat....
I followed the Cluster Beanie Tutorial for the top portion (using a size chart) & added a brim to it using the rest of this Crochet Women's Peaked Hat free pattern.
I love how it turned out! Yay!
I added a flower to this hat using the flower tutorial here. I left one side of the brim down. I don't know if I like it up or down (yet). I may flip it up and add a button later. I'll give it a try without it up. Kinda cute that way ^_^
I used this same cluster stitch for my preemie crochet hat here. Awe he was so tiny. He's filled in quite a bit since then.
Wednesday, October 22, 2014
Elsa Inspired Crochet Hat
While visiting my sister and my niece, I was told that her birthday party (next month) is a Frozen theme and that my niece will be in an Elsa dress. How cute is that!? Of course, that gave me an idea to make her an Elsa hat to wear to match her dress. She's expecting a baby sister in February so I guess I'll just have to make an Anna newborn hat for a photo session!
I followed the tutorial by Haley here for the hat. She has a beautiful story to why she made the Elsa & Anna hats. There are 2 videos. Part 1, Part 2.
I followed the tutorial by Yolanda Lopez here for the crown. There's 3 videos. Part 1, Part 2 & Part 3. She's so awesome. She does her tutorials in English and Spanish (not that I understand Spanish but it's great for people who do!)
Visit Anne Granger's site for a sizing chart:
I decided not to use white yarn because I think White is just too white for me... if that makes sense.
I learned something new with this project. I had never heard of Blocking your crochet work. It's basically shaping your pieces by pinning it to a foam block & lightly wetting or steaming it.
I found these cute little snowflakes at Walmart for $2/pack! Its not Halloween yet & Christmas stuff is already out! I already had the turquoise gemstones for the hair. I also used clear gemstones for the crown. You can get these at Walmart too or Michaels, Jo-Ann's, Hobby Lobby...
I wish I had more time to crochet. I squeeze in crochet time while I'm nursing or the baby is napping & my 4 year old is out playing in the yard.
I really wanted to finish this last night so while I was crocheting the crown, I had the baby strapped to me and had to chase my 20 month old around... why? Because he grabbed my yarn and started running! He was giggling and laughing because he thinks it's funny.
So I had to crochet standing up with my yarn on a high surface to finish. The 2 month old was fussy so I'm bouncing around and trying to watch the tutorial on my tiny little iPhone! Sometimes I think I'm crazy and just need to sit down. haha really? I have time to sit down? I'm nursing as I type right now!
As crazy as it gets... these are moments as a mom of 3 little boys that I will look back and truly miss. ♥
I followed the tutorial by Haley here for the hat. She has a beautiful story to why she made the Elsa & Anna hats. There are 2 videos. Part 1, Part 2.
I followed the tutorial by Yolanda Lopez here for the crown. There's 3 videos. Part 1, Part 2 & Part 3. She's so awesome. She does her tutorials in English and Spanish (not that I understand Spanish but it's great for people who do!)
Visit Anne Granger's site for a sizing chart:
I learned something new with this project. I had never heard of Blocking your crochet work. It's basically shaping your pieces by pinning it to a foam block & lightly wetting or steaming it.
I found these cute little snowflakes at Walmart for $2/pack! Its not Halloween yet & Christmas stuff is already out! I already had the turquoise gemstones for the hair. I also used clear gemstones for the crown. You can get these at Walmart too or Michaels, Jo-Ann's, Hobby Lobby...
I used E6000 to glue the gems & snowflakes on the crown & hair.
I was pretty excited about the finished hat. I can't wait to give it to my niece!
This foam head (with a nose ring!) is small. This is actually for a 2 year old. I know it will fit because I used the sizing chart and I tried it on my son who is 3 months younger than my niece. Shhhh! Don't tell daddy!
I wish I had more time to crochet. I squeeze in crochet time while I'm nursing or the baby is napping & my 4 year old is out playing in the yard.
I really wanted to finish this last night so while I was crocheting the crown, I had the baby strapped to me and had to chase my 20 month old around... why? Because he grabbed my yarn and started running! He was giggling and laughing because he thinks it's funny.
So I had to crochet standing up with my yarn on a high surface to finish. The 2 month old was fussy so I'm bouncing around and trying to watch the tutorial on my tiny little iPhone! Sometimes I think I'm crazy and just need to sit down. haha really? I have time to sit down? I'm nursing as I type right now!
As crazy as it gets... these are moments as a mom of 3 little boys that I will look back and truly miss. ♥
Thursday, September 25, 2014
Crochet Boot Cuffs
It's almost fall! It's been super hot but today, it actually rained! It was a nice change.
I need to make crocheted boot cuffs. I LOVE the look of boot socks but my calf is so big, there's no room for bulky socks! :P
I followed the tutorial here. You can make these with any stitches and design... I hope to have time to make more adding cute buttons and maybe bows? Fall will be here before you know it! We'll see!
Instead of using my tripod, I asked my 4 year old to take photos of my legs. I think he did an awesome job! Don't you? haha
Saturday, September 20, 2014
Toy Story Alien Crochet Hat
I made this little hat so that my 1 month old baby can wear it to match my other boys... Woody & Buzz Lightyear.
Doesn't it look like he's reaching for "The Claw"? hehe
And here is the trio!
Monday, September 8, 2014
Crochet Toy Hammock
My son doesn't want to give up his stuffed animals. He has his favorites that sleeps with him in his bed but the rest... they're all over his room. When I asked if we can put them away, he says he still wants them. I hope he doesn't end up like me, a pack rat. I've been better lately but for the longest time, everything had a sentimental value... everything. My husband thinks I'm crazy because I keep the cord thingy (yes thingy) from our kids' umbilical cord! I bet I'm not the only one! :)
Anyway, I decided to crochet a hammock to get the stuffed animals off the floor. I found a pattern on Wikihow and asked him what color he wanted. Of course it's green. It's always green. I wonder how long that will last until he has a new favorite color?
Friday, August 15, 2014
Crochet Preemie Hats
I crocheted several hats for my son while pregnant but he didn't fit any of them because he was born early at 34 weeks just over 5 lbs. When I took him home he was only 4 lbs 14 oz.
I followed this tutorial for the Crochet Cluster Beanie.
The Crochet Cap is just double crochets with a brim. It's similar to this tutorial (adjusting yarn and hook size as necessary).
The hats are so teeny that I was able to finish one while nursing (20-30 mins). I'm sure it would be faster if I had both hands free. I had to work around nursing but it wasn't too bad...
10 day old Dustin wearing the Crochet Cap
10 day old Dustin wearing the Crochet Cluster Beanie
Monday, July 14, 2014
Crochet Lanyard
Some days I wear outfits that I just can't clip my work badge to. Maternity clothes with all the stretchy bands and fake pockets, really gives me no option to clip the darn thing to LoL
I have a work lanyard I would use if I needed one but it's not pretty :) and who doesn't like pretty things?
I've been looking for smaller crochet projects and I figured a lanyard would be easy and not so time consuming.
I'm not as happy with the results because the little flowers will twist. Next time I make it, I'll crochet the lanyard and attach flowers instead of using the flowers as part of the lanyard length.
I followed the tutorial for the Crochet Romanian Point Lace Wide Cord here. And the Floral Cord Lace tutorial here. Both tutorials are from the same person. She's fast so if you're slow like me, pay attention (or pause) lol
MATERIALS USED:
Yarn (I used cotton)
Crochet Hook (Size 5mm)
Scissors
Lanyard Clip
I've been looking for smaller crochet projects and I figured a lanyard would be easy and not so time consuming.
I salvaged the lanyard clip from an old lanyard in our junk drawer.
I'm not as happy with the results because the little flowers will twist. Next time I make it, I'll crochet the lanyard and attach flowers instead of using the flowers as part of the lanyard length.
I followed the tutorial for the Crochet Romanian Point Lace Wide Cord here. And the Floral Cord Lace tutorial here. Both tutorials are from the same person. She's fast so if you're slow like me, pay attention (or pause) lol
MATERIALS USED:
Yarn (I used cotton)
Crochet Hook (Size 5mm)
Scissors
Lanyard Clip
Friday, July 11, 2014
Crochet Round ball
My 17 month old loves to throw things so I've been trying to think of soft things to give him. Of course my 4 year old hears me talking about a crochet ball and he said "I want a green one please!"
I came across this free pattern for a crochet sphere ball on Ravelry. I added an Easter egg with beans and it's a rattling ball! Fun! I can't remember where I read the suggestion (Pinterest maybe?).
I'm trying my best to get used to written patterns. Up until this point, I have always watched YouTube tutorials because it's easier for me to follow along. Lately, I'm challenging myself to read patterns! Here goes!
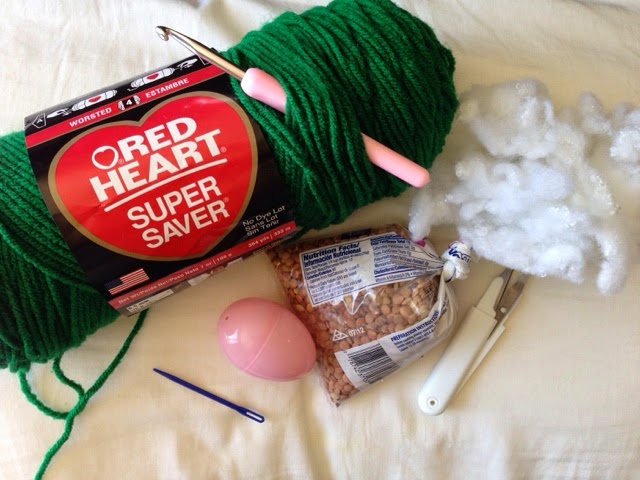
SUPPLIES:
Yarn (I used Red Heart 4 ply worsted yarn in Paddy Green)
Crochet Hook (I used 5.5mm)
Yarn Needle
Scissors
Batting (used batting from pillow $1.99 at Ikea!)
Plastic Easter Egg
Beans (I had Lentils on hand)
DIRECTIONS: Follow the pattern here.
When you are decreasing, make sure you fill the egg and insert it before your hole gets too small.
Fill batting around the egg.
It was a fun little project but now that I'm done, I wish I had glued the egg shut! If you squeeze it too hard, you can hear it pop open. I haven't had any lentil beans fall out yet. As long as I squeeze it in the other direction, it shuts closed. It's in there pretty snugly.
Thursday, July 10, 2014
Crochet Face scrubbies
I don't wear a lot of makeup (foundation) but when I do, I feel like I can't remove the makeup! These cotton scrubbies are perfect for washing my face. Just throw it in the laundry and reuse! I'm assuming the little monster in the washing machine or dryer will eventually steal it as they have been with our socks. So it's a good idea to make extra! haha
These are pretty simple to make.
It's just like starting any hat pattern.
You use very little yarn.
You need to know how to do a slip knots, chain stitches,
single crochets (SC), & double crochets (DC).
You can start with a magic circle or a chain stitch.
You can make these for yourself or gifts for your girlfriends.
Make it slightly bigger, & it's a coaster! haha
SUPPLIES:
Cotton Yarn (I used Peaches & Creme)
Crochet Hook (5mm)
Scissors
Yarn Needle
DIRECTIONS:
Starting with a slip knot:
Create what looks like a pretzel (1)
Pull yarn up with hook (2)
Pull ends to tighten but not too tight! (3)
Yarn over (4)
Pull through loop (5)
Chain 5 (6)
Pull yarn up with hook (2)
Pull ends to tighten but not too tight! (3)
Yarn over (4)
Pull through loop (5)
Chain 5 (6)
Slip stitch to join into the first stitch
Put hook through loop (1)
Yarn over and pull through loop (2)
Completed slip stitch (3)

Put hook through loop (1)
Yarn over and pull through loop (2)
Completed slip stitch (3)

Row 1: 8 single crochets (sc):
Place hook in the middle of loop (1)
Yarn over & pull the yarn through hook (2)
You will have 2 loops on the hook (2)
Yarn over again (2)
Pull through both loops (3)
Row 2: 16 double crochets (dc):
Chain 2
Yarn over & go through the 1st stitch (1)
Yarn over & pull through
You will now have 3 loops on hook (2)
Yarn over pull through 2 loops only (2 - 3)
Yarn over and pull through remaining 2 loops (3)
Repeat another dc in the same stitch
You will have 2 dc in each stitch for a total of 16 stitches (4)
Slip stitch at the end to join (5)
Row 3: 24 double crochets (dc)
Chain 2
1 dc in the first stitch
2 dc in the next stitch
1 in the next stitch
2 in the next stitch...
You repeat this all the way around for a total of 24 stitches
Slip stitch at the end to join
Cut off yarn and pull tail through.
Using Yarn needle, sew both ends into the scrubbies.
Now make another!
Crochet Newborn Basket Prop using Fabric
There's an awesome tutorial here for a DIY crochet basket. If you're a beginner, I recommend you go to that tutorial :) It even has instructions to make the fabric yarn out of fabric. I already made my own fabric yarn. See the tutorial here!
My base for the basket is about 13 inches. It's a little bigger than the linked tutorial. The purpose of my basket is to use it as a newborn prop so I need it a little larger.
I used about a king size flat sheet ($3 at Goodwill!) to make the Fabric yarn. The crochet hook I used was a 15.75 mm. I didn't have anything between 12-15mm. I went bigger.
My base for the basket is about 13 inches. It's a little bigger than the linked tutorial. The purpose of my basket is to use it as a newborn prop so I need it a little larger.
I used about a king size flat sheet ($3 at Goodwill!) to make the Fabric yarn. The crochet hook I used was a 15.75 mm. I didn't have anything between 12-15mm. I went bigger.
You start with a magic circle and crochet 8 single crochet stitches
Working in a continuous round (a marker would be helpful):
2 single crochets (increase) in each stitch. Remember to go through 2 loops. You'll end up with 16 stitches.
Next, single crochet in the first stitch and 2 single crochets (increase) in the next stitch. Repeat this all the way around. I use the tail to mark the beginning of the next round (like the photo below). I move it up after each round.
Next, single crochets in the next 2 stitches and 2 single crochets (increase) in the next stitch (1, 1, 2...) & repeat all the way around.
Each round you will add another single crochet stitch before an increase stitch.
1, 1, 1, 2
1, 1, 1, 1, 2
1, 1, 1, 1, 1, 2
Stop when you have reached the desired width. Again, mine was 13 inches.
Because it's already imperfect and chunky, adding more fabric was no biggie. I just double knotted and continued.
Once I got my desired width, I started single crochet stitches through front loop only. This is different from the linked tutorial that goes through both loops. It's a personal choice.
After this round of one loop only, you will do one single Crochet through both loops until you reach your desired height.
I purchased the other 2 baskets from Ross for about $8. Pretty good deal :) but something about making your own makes it better and for $3!
And here is my son who surprised us by arriving 6 weeks early but he did so well in the NICU, he came home in one week!
Subscribe to:
Posts (Atom)
Crochet Lulu Pom Pom Scarf
Let's face it. Kids things are cute. They're miniature and the kiddos look good modeling anything! Anyone who knows me knows ...
-
I've put off making these because I always get so intimidated by them and also, I don't particular like working with things that ...
-
I have been wanting to make a c2c blanket for some time now. I have so many things on my to-do list that I never got around to it. Recent...